Because I will do this for every domain I have, so I write a post here to help my self and hope it will help you too.
Note: All red texts will need to be replaced with your own information. All “sneeit” text will need to be replaced with your domain name.
Step 1: Access Your Hosting Console
If you connected your hosting via SSH software like Bitvise, just login using that software to access console. If not, just login to your Digital Ocean account, choose Droplets, in droplet list, choose the droplet that you want to process, then click Access and press Launch Console button. You will need input username (root) and password to access the console completely. If you forgot your root password, you can click Reset Root Password button in Access tab to get a new pass.
Step 2: Create SSL Certification
Input into your console with below script (replace sneeit with your domain name):
openssl req -new -newkey rsa:2048 -nodes -keyout sneeit.key -out sneeit.csr
After inputting the script, the console will ask you the some specific information. Just input that with your Domain Registration Information. Here is the information you will input (replace sneeit with your domain name):
Country Name (2 letter code) [XX]: 2 LETTERS, FIND CODES HERE
State or Province Name (full name) []: Yourcity (ex: New York)
Locality Name (eg, city) [Default City]: Yourcity (ex: New York)
Organization Name (eg, company) [Default Company Ltd]: Sneeit
Organizational Unit Name (eg, section) []: Sneeit
Common Name (eg, your name or your server's hostname) []: sneeit.com
Email Address []: [email protected]
The console will continue asking you something like extra password or common name, just leave them BLANK and enter.
After all, you type “ls” command in console and you will you see 2 files: sneeit.csr and sneeit.key
Type “nano sneeit.csr” to open the file content (if your OS not support “nano”, try “vi” or “vim” instead).
Copy the whole certification script inside the file and then press CTRL+X to escape (CTRL+Z if you used “vi”)
Step 3: Active Domain SSL
Login to your NameCheap Dashboard, click Domain List (1). Please make sure you selected All Products option (2, 3). Click “V” button (4) on the line of the domain you want to active SSL to slide down a box then click on the Active button (5) in the box.
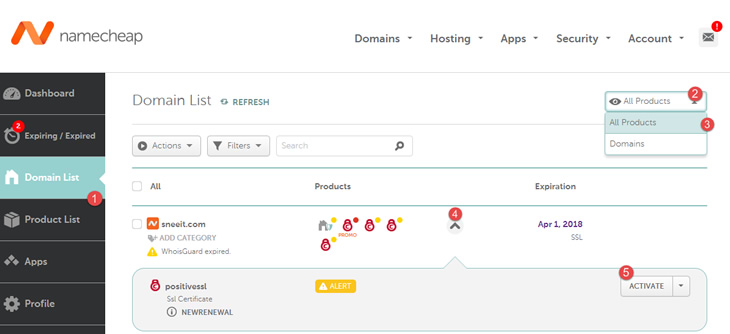
Active SSL for Domain in NameCheap Dashboard
You will input some information as following steps:
- 1/5 Enter CSR & Domain PositiveSSL will cover: the certification script that you copied from sneeit.csr file
- 2/5 Check PositiveSSL: just choose “Any other server (cPanel, Apache, NGINX, etc.)”
- 3/5 Confirm that you own the domain: choose “Email” for “DCV Method” field, and “*****[email protected]” for “Approver email” field
- 4/5 PositiveSSL contacts: input the email that you used to registered your domain. You will receive all next emails via this address.
- 5/5 Review & Submit: just click “Submit”
Step 4: Active Server SSL
You will receive an email with a content like:
To permit the issuance of the certificate please browse here
and enter the following “validation code”:
-awefawnauawefawGAtEwaefAfQNEaw*
Copy the code and then click the here text in the content to access a site which will allow you input the code. Just input and click Next.
After that, you will receive another email (it may take 2-5 minutes to receive this email) which has an attach file with name: sneeit_com.zip.
Just download that file, extract it, you will see sneeit_com.ca-bundle and sneeit_com.crt file inside. Upload all those files to your hosting.
With nginx, we will need to merge those two files into one. Just access your server console, move to the folder that you uploaded the above files (use “cd” command) and input the following command to generate a new file from the two above files:
cat sneeit_com.crt sneeit_com.ca-bundle >> cert_chain.crt
Now, we will need to edit your domain config to target to the file that you just generated. The config file usually stays under the following path on your server: /etc/nginx/conf.d/yourdomain.com.conf (if you have no that path, try with /usr/local/nginx/conf or /usr/local/etc/nginx)
Open the file with “nano” (or “vi”, or “vim”) on your console, add the following code to your config file after the line server {
listen 443 ssl;
 server_name sneeit.com www.sneeit.com;
 keepalive_timeout 30;

ssl on;
 ssl_certificate /root/cert_chain.crt;
 ssl_certificate_key /root/sneeit.key;
 ssl_session_timeout 5m;
 ssl_session_cache shared:SSL:10m;
 ssl_protocols TLSv1 TLSv1.1 TLSv1.2;
Remember change the server_name to your domain name, ssl_certificate to the path of the cert_chain.crt file above and ssl_certificate_key to the path of your domain.key file (that you generated from step 2).
Save the config file. And reload nginx with the following command on your console:
nginx -s reload
Step 5: Check your SSL Certification
Everything is done now. Just wait few minutes and then access your domain with your browser, if the address bar of the browser show Secure status, that’s mean you installed SSL Certification successfully. Congratulation!
You can also access https://decoder.link/sslchecker/sneeit.com/443 to check your SSL status.