Sneeit Spot is the most powerful tool for the Blogger platform at this time. So it would be a huge advantage for your themes if they are compatible with the extension. That's the reason we write this documentation so you (theme author/developer) can make your theme codes work well with the extension.
Prepare for defines
We will put all defines inside the following code:
<b:if cond='false'><![CDATA[
... your defines will be here ...
]]></b:if>
I recommend you place it at the end of your theme code before the body tag so you can access it easily.
Define theme options
You will need to put your option defines inside the following code:
SNEEIT-THEME-OPTIONS
... your theme option defines will be here ...
SNEEIT-THEME-OPTIONS
At first, you will define an option group. For example, the Site Layout group:
"Site Layout" : {
... your individual option define will be here ...
}
Then you find a code that you want to provide an option to alter it. In this example, I have a code like the following in my theme code:
.wrapper {
    padding: 20px 20px 30px 20px;
    max-width: 100%;
    width: /*-var-wrapper-width-start*/1100px/*-var-wrapper-width-end*/;
    box-sizing: border-box;
}
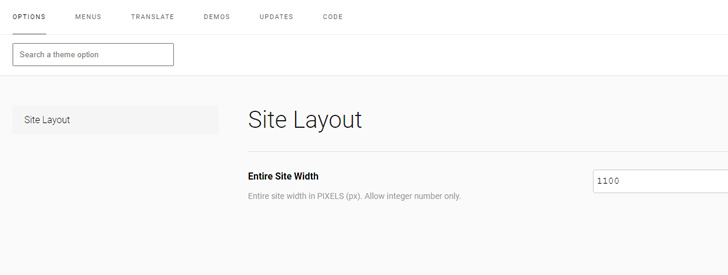
And I want to set an option so users can change the number 1100. Here will be the code I define for the option:
"Entire Site Width": {
    "start": "/*-var-wrapper-width-start*/",
    "end": "px/*-var-wrapper-width-end*/",
    "type": "number",
    "default": 1100,
    "desc": "Entire site width in PIXELS (px). Allow integer number only."
}
The extension will replace ALL values which are staying between the start and end texts. The final code will be:
<b:if cond='false'><![CDATA[
SNEEIT-THEME-OPTIONS
"Site Layout" : {
    "Entire Site Width": {
        "start": "/*-var-wrapper-width-start*/",
        "end": "px/*-var-wrapper-width-end*/",
        "type": "number",
        "default": 1100,
        "desc": "Entire site width in PIXELS (px). Allow integer number only."
    }
}
SNEEIT-THEME-OPTIONS
]]></b:if>
Now, update your theme code, and access Sneeit Spot, choose Options and you will see:
Option define format
Basically, an option can be defined as follows:
"option-name": {
    "title": "Optional, if missing, it will show the option-name instead",
    "start": "Required. The text to search the start position of value in theme code",
    "end": "Required. The text to search the end position of value in theme code",
    "type": "Optional. If missing, it will be a text. Support types: text, number, radio, checkbox, select, color, font",
    "default": Optional. Default value. Which be use to reset in Sneeit Spot UI,
    "desc": "Optional. Show description for the option in Sneeit Spot UI",
    "show": {
        /*
        option-A and option-B will show if this option's value is value-01
        otherwise, they hide
        */
        "value-01" : "option-A, option-B",
        "value-02" : "option-C"
    },
    "actions" : {
        /* if this option's value is "value-01" */
        "value-01" : [
            /* "seeking_string" will be replaced with "final_string"
               when users click "Save" button
            */
            {
                "replace" : "seeking_string",
                "with" : "final_string"
            },
            /* html tag, not matter <html> or <html attrs="values"> or others format
               will be replaced with "final_string"
               when users click "Save" button
            */
            {
                "replace_tag" : "html",
                "with" : "final_string"
            }
        ],
        "value-02" : [
            {
                "replace" : "test",
                "width"   : "demo"
            }
        ]
    }
}
All default, uncheck, and check defines can be a Number, String, or Boolean. The string should be wrapped between " (quotation marks). And all defines are following JSON format, so you should understand JSON and should not use "," (comma) after the last elements.
*** The option-name should be unique.
Radio, Checkbox, and Select
Some specific options like radio, checkbox, or select will have different declarations. Here is a checkbox option:
"checkbox-example": {
    "start": "Required",
    "end": "Required",
    "type": "checkbox",
    "check": Optional. Actual value that will be used to replace in the theme code when user opt-in this checkbox,
    "uncheck": Optional. Actual value that will be used to replace in the theme code when user opt-in this checkbox
}
Radio option:
"radio-example": {
    "start": "Required",
    "end": "Required",
    "type": "radio",
    "choice": {
        "radio-1-value" : "Label of Radio 1",
        "radio-2-value" : "Label of Radio 2",
        "radio-3-value" : "Label of Radio 3"
    }
}
Select option:
"select-example": {
    "start": "Required",
    "end": "Required",
    "type": "select",
    "choice": {
        "option-1-value" : "Label for Option 1",
        "option-2-value" : "Label for Option 2",
        "option-3-value" : "Label for Option 3"
    }
}
Textarea option:
"select-example": {
    "start": "Required",
    "end": "Required",
    "type": "textarea",
}
Define theme menus
Example
If your theme has a link list code like the following:
<!--MAGONE-MAIN-MENU-LOCATION-START--><ul class="menu"><li class="menu-item-type-custom menu-item" data-class="" data-enable_mega="" data-icon="fa-facebook"><a data-href-default="https://magonedemo.blogspot.com/" data-text-default="Home" href="https://magonedemo.blogspot.com/">Home</a></li></ul><!--MAGONE-MAIN-MENU-LOCATION-END-->
And you want to allow users to manage it via Sneeit Spot UI, you can define it in your theme code like following:
SNEEIT-THEME-MENUS
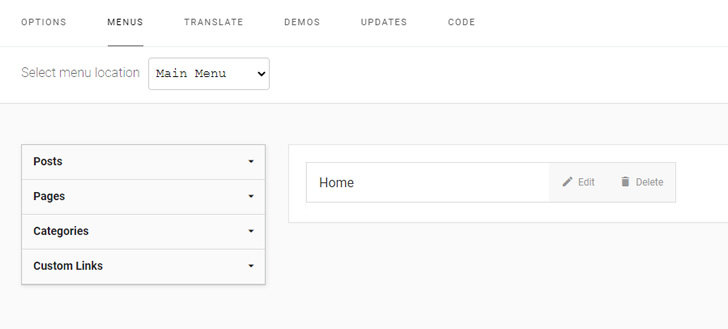
"main_menu": {
"title" : "Main Menu",
"start": "<!--MAGONE-MAIN-MENU-LOCATION-START-->",
"end": "<!--MAGONE-MAIN-MENU-LOCATION-END-->",
"fields" : {
"enable_mega": {
"title": "Enable Mega",
"desc": "Enable Mega Menu For This Menu Item",
"type" : "checkbox",
"default": "",
"check": true,
"uncheck": "",
"allow_depth" : [0]
},
"icon": {
"title": "Menu Icon",
"desc": "Check code at <a href=\"https://fontawesome.com/v4.7.0/icons/\" target=\"_blank\">FontAwesome Icon Code</a>"
}
}
}
SNEEIT-THEME-MENUS
Update your template, access Sneeit Spot and choose Menu, then you will like this
Define format
The main_menu will be the name of the menu location. You can have an unlimited number of locations. Each location will have the following properties:
- title: optional. If missing, the name will be used
- start: the text for searching the start position of the menu code in the theme code.
- end: the text for searching the end position of the menu code in the theme code.
- fields: extra fields show to users when they are editing a menu item
Each field in a field property can be defined following the format of the option declaration, but they have no start and end texts. They can also have a special property which is called: allow_depth. This property is an array of the levels which allow this field. In the example, the field enable_mega will only show to users if they are editing a level 0 menu item.
Output Structures, Classes and Attributes
You may need to know the output HTML of the menu code, especially the class for each tag, so you can create styles for your theme easier. Here are some notes:
- The output HTML of menu will usually like following
<ul class="menu"> <li class="menu-item-has-children menu-item-type-custom menu-item" data-class="" data-enable_mega="true" data-icon=""> <a data-href-default="#" data-text-default="Demos" href="#">Demos</a> <ul class="sub-menu"> <li class="menu-item-has-children menu-item-type-custom menu-item" data-class=""> <a data-href-default="#" data-text-default="Best Adapted " href="#">Best Adapted </a> <ul class="sub-menu"> <li class="menu-item-type-post menu-item" data-class="menu-item-type-post"><a data-href-default="/2000/09/the-new-york-times.html" data-text-default="NYTimes" href="/2000/09/the-new-york-times.html">NYTimes</a></li> </ul> </li> </ul> </li> </ul> - The top ul tag will always have only the "menu" class. All sub-ul tags will have a "sub-menu" class.
- All li tags will have a "menu-item" class and the type classes depending on its style: "menu-item-type-custom", "menu-item-type-page", "menu-item-type-post", "menu-item-type-category"
- If a li tag has a ul tag inside, it will have the class "menu-item-has-children"
- All fields value will be stored in attributes of li tags under format: data-field_name="value". In the example, the field enable_mega will appear in li tag as data-enable_mega="true"
Define theme translate
Texts in XML
If you want to translate a text in your theme code you will need to wrap that text with a special span. For example, if your theme code has a text like Back Home and you want the user can translate that text via Sneeit Spot UI, you can wrap that text in the following format:
<span data-l10n='Back Home'>Back Home</span>
The text in data-l10n is case-sensitive, so you should make sure you call exactly the text when using JavaScript.
Text in JavaScript
If you want to use a text in JavaScript, you can define a function in your JS code as follows:
function trans(id) {
    var html = $('[data-l10n="' + id + '"]').html();
    if (typeof(html) == 'undefined' || html == '') {
        return id;
    }
    if (typeof(arguments) != 'undefined' && arguments.length > 1) {
        var vars = html.split('$$');
        html = '';
        for (var i = 0; i < vars.length; i++) { if (vars[i] && !isNaN(vars[i]) && typeof(arguments[Number(vars[i])]) != 'undefined') { html += arguments[Number(vars[i])]; } else { if (i > 0 && (!(vars[i] && !isNaN(vars[i - 1]) && typeof(arguments[Number(vars[i - 1])]) != 'undefined'))) {
                    html += '$$';
                }
                html += vars[i];
            }
        }
    }
    return html;
}
and then you can call the trans function each time you want to use a text. For example:
var back_home_text = trans('Back Home');
Or you can add a JSON object to define translatable texts which will be used in your script. Here is the code:
<script type='text/javascript'>//<![CDATA[
var SNEEIT_THEME_JS_TRANSLATE =
/*SNEEIT-THEME-TRANSLATE-JS*/
{
"Text1" : "Text1",
"Text2" : "Text2"
}
/*SNEEIT-THEME-TRANSLATE-JS*/
// ]]></script>
Sneeit Spot will scan the JSON object between the two anchors: /*SNEEIT-THEME-TRANSLATE-JS*/ and show all translatable in the Translate tab. Then when you want to use a text in your JS code, you just need to call:
SNEEIT_THEME_JS_TRANSLATE['Text1']The variable name "SNEEIT_THEME_JS_TRANSLATE" is at your choice